Wednesday, December 31, 2014

New Year...New Linky: Favorite Things


New Year...New Linky!


Coming to Teaching Trio in January on the first Wednesday of each month is another quick and easy linky party! 

These are a Few of My Favorite Things is a monthly linky where you can share your 3 favorites in any category you want. It could be your 3 favorite picture books, 3 favorite ideas for teaching matter, 3 favorite math websites, or anything else you want to share that week.

Of course raindrops on roses and whiskers on kittens are some inspired choices to share as well! Something about this linky makes me hum a happy tune.....


Use our easy template for a quick blog post or expand on each one if there's more you want to say.  

This linky is designed to be a simple and fun way to connect with your followers.


Here's what to do:
1. Just save the image above, add your text to it (we use PowerPoint), and post! 
2. Include the button above and a link to Teaching Trio on your post.
3. Link up here on the first Wednesday morning of the month (or whenever :) )  The linky will be open for a week.
4. You are welcome to share TPT products, BUT you may only include one of your own products each week. We want to see things from other fabulous TPT authors too! (This post is not intended for self-promotion.)
6. Be a good blog reader, and leave some love for the two posts before yours!


The linky will up and running the first Wednesday in January 2015!  Get your lists ready!

We can't wait to see your favorite things!


Sunday, December 28, 2014

Sunday Scoop {12/27/14}


The Sunday Scoop is based on the popular 3-2-1 graphic organizers so many of us use with our students. Tell us three things you HAVE to do, two things you HOPE to do, and one thing you're HAPPY to do (because these days, we could all use a little motivation to find something to be happy about every week!). It's a short and sweet way to connect with each other every Sunday (or Monday... the linky will stay open all week!)
Here's what to do:
1. Just save the image above, add your text to it (we use PowerPoint), and post! You don't even have to explain yourself any further if you don't want to.
2. Include the button above and a link to our  blog on your post.
3. Link our post up here on Sunday morning (or whenever :) )
4. Be a good blog reader, and leave some love for the two posts before yours!


I hope you're enjoying the rest of your winter break as much as I am. Link up your Sunday Scoops below! Have a great week!


Wednesday, December 24, 2014

Merry Christmas & a Giveaway winner!


Just stopping in today to say Merry Christmas to all of our wonderful followers!

Remember, there will be no Tech Thursday tomorrow due to Christmas, but we will be back on Sunday with the Sunday Scoop and a very exciting Tech Thursday on New Year's Day!

The winner of our TPT giveaway is...

a Rafflecopter giveaway

Congrats Liz! You should receive an email from us today with your gift certificate.

Monday, December 22, 2014

Top 10 Reasons Teachers Love Christmas


10.  I get to decorate my Christmas tree for free with teacher ornaments.

9.  I can wear Santa hats, reindeer ears, and elf ears at work without getting funny looks.

8.  I can create math problems that start like this... If Santa's sleigh weighed 500 pounds and was traveling at 80 miles per hour ...

7.  Tacky sweaters and shirts are ALL the rage - kids love them!

6.  I get to add to my collection of teacher mugs.


5.  My favorite Christmas movies can become lesson plans!

4.  My countdown to Christmas ends on the last day of school when I pull out of the parking lot!

3.  I get the privilege of hosting a Christmas party with 25 hyped up kids. Who wouldn't want to do that?

2.  I can answer the phone, "Buddy the Elf, what's your favorite color?" And no one thinks I'm crazy. Okay, maybe they think I am still a little crazy…


AND the TOP reason that teachers love Christmas….. drum roll please….. 


1.  I can tell my class, "You know, Santa calls teachers.”


Merry Christmas!


Sunday, December 21, 2014

Sunday Scoop {12/21/14}


The Sunday Scoop is based on the popular 3-2-1 graphic organizers so many of us use with our students. Tell us three things you HAVE to do, two things you HOPE to do, and one thing you're HAPPY to do (because these days, we could all use a little motivation to find something to be happy about every week!). It's a short and sweet way to connect with each other every Sunday (or Monday... the linky will stay open all week!)
Here's what to do:
1. Just save the image above, add your text to it (we use PowerPoint), and post! You don't even have to explain yourself any further if you don't want to.
2. Include the button above and a link to our  blog on your post.
3. Link our post up here on Sunday morning (or whenever :) )
4. Be a good blog reader, and leave some love for the two posts before yours!

My 3 things I have to do should be done by noon today which will leave the rest of my day free! My student gifts are all finished, just need to stick all of the pieces in the bag. I will blog all about what I gave my students later on. :) I am almost all prepped for January. A few pages left to copy and some interactive notebook pages to cut out and I am done! Clean house... this is a constant!

My family is coming to my house the weekend after Christmas to celebrate. They are so willing to work around our crazy schedule this time of year. My sis and her fiancé will be staying with us. I need to get all the groceries for the big meal and also for the weekend of family being here! Let's just say I have a grocery list that is 2 pages long!!! The hubs decided to buy a few more gifts... so more wrapping for me...

I absolutely love making sugar cookies. It is seriously one of my favorite deserts this time of year!!!

You can link up your Sunday Scoops below! But... before you go, don't forget to enter our TPT Gift Certificate giveaway!


Saturday, December 20, 2014

All I want for Christmas is... {a giveaway!}


a TPT Gift Certificate! 


What's the very best gift you could get a teacher? A gift certificate to TeachersPayTeachers, of course! A TpT gift certificate is worth gold! Seriously! Being able to purchase top-notch teaching resources instead of having to create them yourself saves precious time, time that can be spent over the holidays relaxing or enjoying special moments with family and friends.

TeachersPayTeachers recently gave their gift certificates a make-over, and now each certificate has it's own unique color. You can purchase a gift certificate for any amount between $10 and $200. Wow! Imagine what you could do with a $200 gift certificate! Click over to the TpT Gift Certificate page  (You'll need to be logged in to see it).


As a Christmas gift for our fabulous followers, the Teaching Trio is giving away a $10 TPT certificate this week! Enter in the Rafflecopter below before midnight on the 23rd, and we will announce a winner on Christmas Eve! You can earn up to 9 entries if you complete all the items listed, but it's fine to just complete one or two.


We are also teaming up with some of our other teaching blog friends who are each also giving away a $10 TpT gift certificate. You'll find all of their links at the bottom of this post. If you don't see many blogs linked up, check back tomorrow to find the others. You have to enter each contest separately, and each of us has a slightly different process for entering their giveaway. Be sure to read the directions on each blog before entering.


http://new.inlinkz.com/luwpview.php?id=478582" title="click to view in an external page.">An InLinkz Link-up


Thursday, December 18, 2014

Tech Thursday: 5 Save Tips for Office Apps


Technology Thursday is a weekly linky dedicated to all things technology related. Share reviews of websites or apps you've tried, tech tips that make your {teaching or personal} life easier, and helpful tutorials. Our hope is that this linky provides a place for teachers to share and learn new ways to use technology and engage students!

Be a rule follower!
Rule #1: Include the image above and a link to our blog somewhere in your post.
Rule #2: Be a good blog reader...visit the two blogs who link up before you and leave some love on their pages!
Rule #3: This linky is not intended for product promotion. You may include products you've created in your posts, but they should not be the sole focus of the post.


This is the 6th installment in our PowerPoint Potential series, and I'm excited to share something I learned over the summer! I have to admit, I had never paid any attention to the save options in PowerPoint (and Word, and Excel) before, but there is a lot of good stuff hidden in those menus!

First, let's talk about some things you can do when you click Save Options...
1. Autosave Intervals - The default is usually 10 minutes. I don't know about you, but I can get a lot done in 10 minutes that I don't want to lose! I change mine to every 3 minutes. In Word & Excel, I set it at 1 since the files usually much smaller.

2. Embed Fonts - This was a HUGE game changer for me! You know that cute font you have at home that you really want to use in the PowerPoint you're making for your class, but you know you can't because the IT department will.not.let.you.install.anything on your school computer? If you embed the fonts in your file (PPT or Word), then you can see and use the cute fonts you've installed at home in this file on any computer - anywhere!

All you have to do is check the box that says "Embed fonts in this file." If the file is final and you won't change it, you can leave it set to "embed only the characters used" (for a smaller file size), but if you plan to edit on another computer, change it to "embed all" so that all characters in the font are embedded. Just to clarify, it will only embed the fonts you have used in this file. Thank you, Mary from Fit to be Fourth, for sharing this one with me last summer!

Now, let's look at the next option when you click Tools, General Options...
3. Password Protection - Did you know you can add a password to your file to protect it from unwanted changes? This is where you can do that! I know most of us secure our PDF files for this purpose, but if you are making and selling a PowerPoint file, this is a must-do! Be sure to enter your desired password beside Password to Modify instead of Password to Open. You wouldn't want buyers not to be able to open your file! 

Last, but not least, we'll look at the last option, Compress Pictures...
4. Delete Cropped Areas - This option deletes parts of pictures you have cropped off. This is especially helpful when you've used a 12x12 paper to fill a 3 inch shape in your file, and can really make a difference in file size!

5. Target Output - What you do here will depend on how you're using this file. The number in parentheses beside each option refers to the number of pixels per inch (ppi), which determines the size of the photo. For my print products, I want to ensure that no one complains of pixelated pages, so I leave it set to use the document resolution. If you are showing it as a PowerPoint only (or printing notes pages for students), you can change it to Screen.

I hope these tips help you make the most of your PowerPoint save options. We'd love for link up with your own tech tips while you're here. Since next Thursday is Christmas, we will be taking the week off, but be sure to stop by the following week, on New Year's Day for a New Year surprise!  


    An InLinkz Link-up
   

Tuesday, December 16, 2014

Making Holiday Ornaments

Can you say PROCRASTINATION?! Last year, my class made their parent gifts way back at the beginning of December. Here it is, almost time for break... and we just started them! Oops. At least the craft that we make is super easy... I have included lots of pics to make it easy for you to follow if you are interested in making these too! I really wish you could smell the "goodness" of these ornaments through the computer... they are delicious. As we were making them we had at least 4 staff members stop in our room because they could smell them from the hallway!! Oh and did I mention... they are super cheap!? A teacher's dream right?
You will first need to gather your materials. You can make the dough ahead of time and store in an airtight container so it doesn't dry out. I made all of the dough at home the night before so it was easier clean-up. Plus, then you don't have to haul everything in to the school. You will need: flour, salt, cinnamon and water. Yep. That's it!
To make the ornaments at school you will also need a variety of cookie cutters, a rolling pin (if you don't have one- the kids can just squish the dough down with their hands) and a spatula. If you mix the dough at school you will also need a measuring cup, a bowl and a spoon.

The recipe is super simple:
1 cup flour
1/2 cup salt
1/2 cup cinnamon
3/4 cup very warm water

As you can see in my picture above, I went totally generic and cheap with the ingredients. I have found that buying quality products doesn't give me any different of a result... so cheap it is!
Add all of your ingredients together in a bowl and mix well. If the dough seems sticky, add a little flour. If the dough seems crumby or hard, add a little water. The consistency should be like play-doh. After mixing it a bit with the spoon, you might have to just dig in and mix with your hands!

Sprinkle some flour on your work surface so the dough doesn't stick and roll out a chunk of it. I would give students a chunk about the size of a tangerine (weird comparison?). Have them roll it so it is between 1/2" and 1/4" thick. If they get too thin... they can easily break. If you go thicker... they will take a little while longer to dry. 

Use the cookie cutters to cut the shapes. Here are a few pictures of my kids working on cutting them.

If the dough is stuck to the counter, use the spatula to gently scoop it off. Use a straw to put a hole in the top of the ornament so that a string/ribbon can be tied through it. Make sure the piece of dough is completely removed from the hole. (Note: if the hole is too close to the edge, the ornament will probably break.)
I had my students place their ornaments on a tray that was covered in wax paper. They put their names on a post it note and stuck it near them so when they were dry we could easily hand them back out. They take between 24-36 hours to dry. After they are dry, I always write the student's name on the back and the school year.
As you can see in the picture, as the dough starts to dry it turns into a lighter tan color. Now the choice is yours. You can either leave them the color they are and put a ribbon on them or you can have your kiddos paint them. We painted ours using regular acrylic paints. (Don't laugh at my example. I painted it under the document camera and it is UGLY...)
Allow some time for the acrylic paint to dry, tie a ribbon or string through the hole and BOOM you are done! The kids absolutely love making these ornaments and each one is so unique. Each one of my kiddos makes two ornaments (unless they have what we call in my classroom a "perfect situation" which means they have more parents to make ornaments for). We wrap them up and make some cards to send home with them. So simple and they smell SO GOOD! If you are procrastinating with parent gifts this year... try making these! :)

Sunday, December 14, 2014

Sunday Scoop (12/14/14)


The Sunday Scoop is based on the popular 3-2-1 graphic organizers so many of us use with our students. Tell us three things you HAVE to do, two things you HOPE to do, and one thing you're HAPPY to do (because these days, we could all use a little motivation to find something to be happy about every week!). It's a short and sweet way to connect with each other every Sunday (or Monday... the linky will stay open all week!)
Here's what to do:
1. Just save the image above, add your text to it (we use PowerPoint), and post! You don't even have to explain yourself any further if you don't want to.
2. Include the button above and a link to our  blog on your post.
3. Link our post up here on Sunday morning (or whenever :) )
4. Be a good blog reader, and leave some love for the two posts before yours!


It's Sunday...already! Time to get to the Sunday Scoop!


What are you up to this Sunday?


Thursday, December 11, 2014

Tech Thursday: Task Card Basics


Technology Thursday is a weekly linky dedicated to all things technology related. Share reviews of websites or apps you've tried, tech tips that make your {teaching or personal} life easier, and helpful tutorials. Our hope is that this linky provides a place for teachers to share and learn new ways to use technology and engage students!

Be a rule follower!
Rule #1: Include the image above and a link to our blog somewhere in your post.
Rule #2: Be a good blog reader...visit the two blogs who link up before you and leave some love on their pages!
Rule #3: This linky is not intended for product promotion. You may include products you've created in your posts, but they should not be the sole focus of the post.
Do you love task cards? Today's PowerPoint potential post is all about how you can make a template and use some grouping and aligning buttons to make task cards. I will first show how to make a template so you don't have to do the layout for them EVERY SINGLE TIME! So here goes... are you ready for picture overload???

First things first. Let's make a template for those pesky task cards. I use task cards for a variety of things in my classroom. They are a center, they are part of my whole group lesson, they are an extension activity for my high thinkers, they are part of a review before a test... it is task card heaven in my classroom. I love how versatile they can be. They are also easy to differentiate with. Usually when I make sets of cards, the beginning task cards are easier and they progress in difficulty. The task cards all look the same and my kiddos have yet to catch on that they are different levels. I just assign specific cards to specific kids. :) 

The first step in creating a template is to open a new document. I have "empty/blank" templates saved already that are sized to allow for margins (i.e. 8"x10" and 10"x8"). Then you will want to create a table. The number of task cards per page can be changed by just adding more columns or rows to your table. I have found that 4 per page is convenient. 
The reason I have started using a table as a guideline for my task cards is because it allows for fewer cuts. Some sellers/teachers create task cards with a white empty space between the task cards. This empty space does not sit well with the perfectionist in me. I would spend at least an extra 2 minutes per page to cut off all that white on the edges. Super time consuming. Anyways... next step is then to drag and reposition your table so it is on one of the corners. Then drag it so it takes up the entire page.
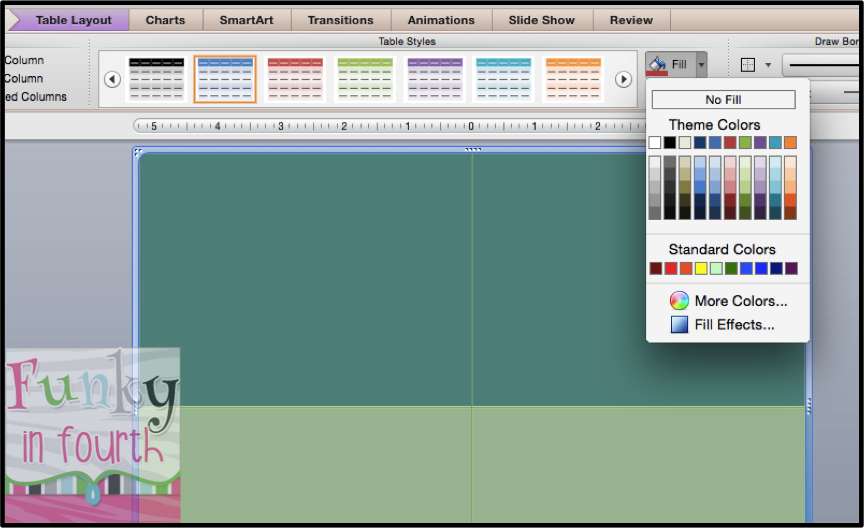
Now maybe your opinion about the blue background is different than mine... but I HATE IT. Quick fix. Select all your boxes by clicking in one and then dragging all the way to the opposite bottom corner. Then go up to "fill" under your tables button. Click on fill and select no fill. This will make your background transparent! Wahoo!
We are almost done with the template, I promise. Next step is to change the lines so that they are just guidelines for your work. For my template the lines are gray, but then with the example of task cards I will show later, I just changed the template table to have white lines using the same steps. There are tons of options under the same table button you were just in with the previous step. If you click the line on the right side you can change the thickness, type of line (dashed, dash space, full line, double line, etc.) and also the color. The great part is you can make the lines on the outside of the table not be there! This makes the inside lines only guidelines for the cuts and your outside guidelines becomes whatever background you choose. 
The trick is to click on your line choice, color choice and then select the lines that you wish to be available by clicking the little grid above the pencil. You can mess around with the options until you find one that works for you. 

The last step is to save this as a TEMPLATE. That way you don't have to redo everything you just did every time you make a task card set. You just open this template and ta-da... it is ready for you! So do your normal file, save as step and title it something that you will know what it is. I titled mine 4 Task Cards just to show you an example. Then you want to select the file type as a PowerPoint Template. It should automatically switch to find the folder "My Templates" so double check that at the top. If it doesn't automatically switch, then do a search for that folder before you save. Having your template saved in that folder is what makes your template show up when you first open PowerPoint.
Now that we have a template saved. Go ahead and close out of PowerPoint completely and reopen it. Your new task card template should show up right there when it first starts. Select it and you your new file should pop up looking similar to this (it might be slightly different depending on what features you chose with the lines).
This is where the fun begins! Find a fun background that you absolutely love. I am officially obsessed with Kristen's Nautical Cheer Digital Papers set. Drag or insert your image into the new file. Don't worry... your template is still blank. When we get done, we will save this as a new file and the template won't be changed at all. Resize your background so it fits your page.
Then make sure your image is selected and click on the format picture tab. Then click on the arrange button. A list of options should pop up including send to back. Click it and your background that you inserted will reorder to the back behind your table template. This is why we set the fill to "no fill" when we set up the table. 
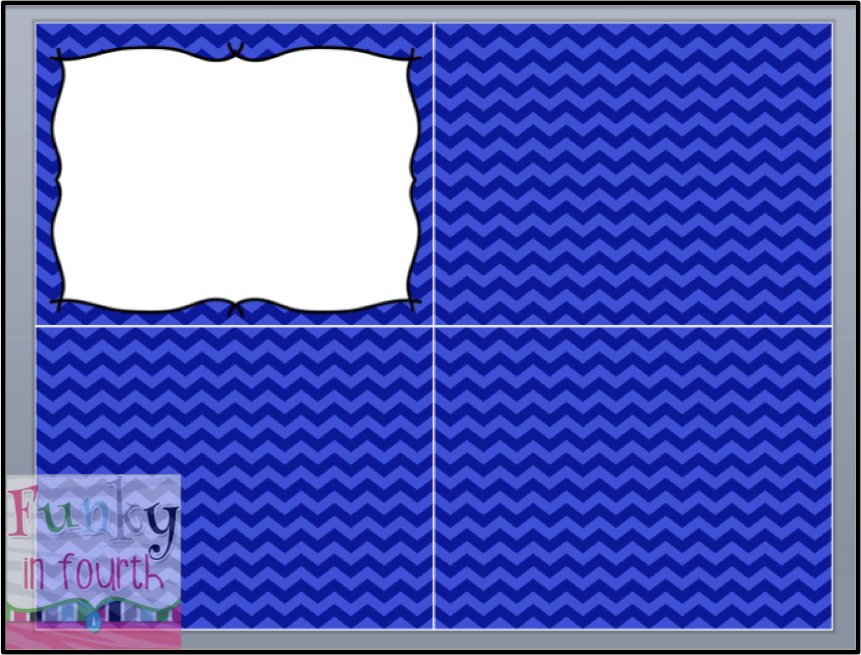
Your gridlines from your template should appear (remember they will be whatever color your template was set up as). You can change the color of the lines by clicking on your table and going to the table tab and then selecting the color/line options that you desire. Now drag in a frame/image with a white background. I used Lovin' Lit's Huge Seller's Toolkit Bundle. Resize the frame to fit inside the gridlines of your table.
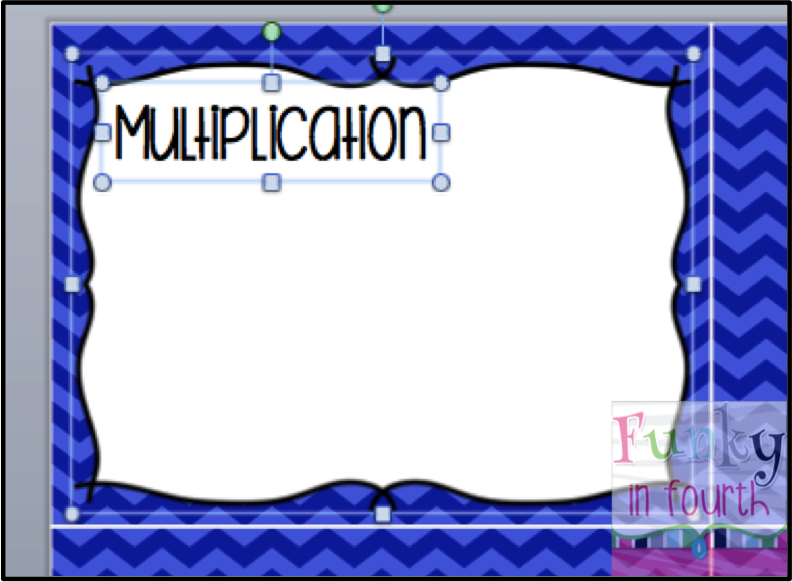
Next add a text box. I try to get it kind of where I am going to want it to be... but I am not perfect. I also don't worry about if it is in the center or not. We will use some fancy settings to make sure that it is. The next image shows the text box that I created. You can tell that the text box is not centered with the frame. That is totally okay. You can also tell that the gridlines are definitely white. Sometimes you have to change the color so that they show up on the background. If you have a predominately gray background, you don't want gray gridlines! Once you have your main text box on the frame, select both the text box and the frame (use the shift key to select more than one object). 
Once you have both objects selected, go to your format tab again and go to the far right side. Click on the button that says align. A variety of options pop up and you can select align center. This will move the objects so that they are centered. Please note: this does not mean that they will be centered in your table! They  are only centered to each other. You will need to adjust their exact location on the page. 
Your next step is then to group these objects together. That way, whenever you move them... the alignment stays centered. Add in the other graphics, text boxes, features, etc. that you wish and you should have a task card completed. Select all of your items that you just added and the original frame/text box group and group all of the elements together. Copy and paste this new group so that you have a task card "layout" in the next box. 
Next super easy step is to get them to line up. Select your two task card "layouts" and go to the format picture tab and then select align. Scroll down to align middle so that the middle of your task cards are now aligned. If you don't have the second layout close to where you want it, it might move both of them (one up and one down). If this happens just drag them up a little so they are in the middle of your table box. 
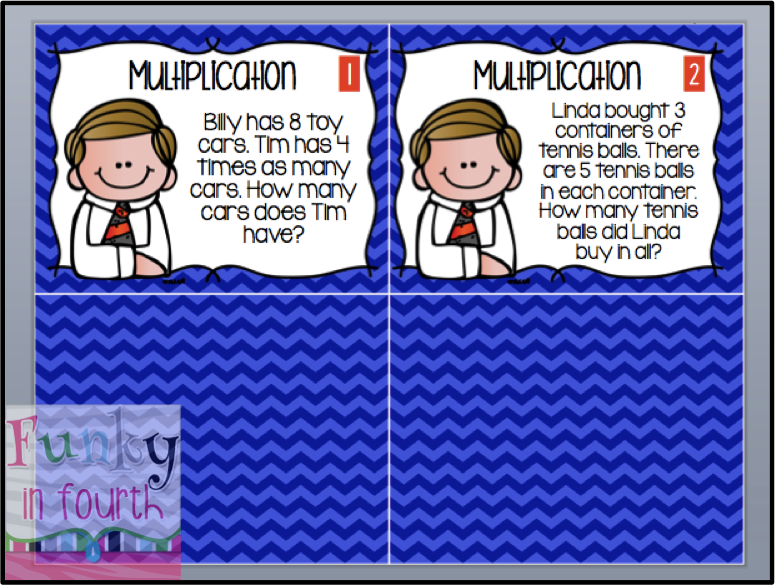
Repeat the last step to get two more task card layouts on your page. As you can see below, I have moved the second set of task cards so now they are all lined up and perfectly aligned. I also changed the text to make 4 different task cards. You can use those align buttons to align to center and align to middle.
And there you have it... using PowerPoint to make a template for task cards and making a page of task cards. Simply select all, copy and paste onto a new slide to add more cards. Make sure you save this file as either a pptx or pdf instead of a template. No more annoying white line of image free space in-between the task cards. 6 simple cuts and you are done! 

I hope that these tips/tricks help make task card creation a little bit easier for you and your classroom. Make sure you link up below with your awesome tech tip for the week!