Sunday, November 16, 2014

Sunday Scoop {11/15/14}


The Sunday Scoop is based on the popular 3-2-1 graphic organizers so many of us use with our students. Tell us three things you HAVE to do, two things you HOPE to do, and one thing you're HAPPY to do (because these days, we could all use a little motivation to find something to be happy about every week!). It's a short and sweet way to connect with each other every Sunday (or Monday... the linky will stay open all week!)
Here's what to do:
1. Just save the image above, add your text to it (we use PowerPoint), and post! You don't even have to explain yourself any further if you don't want to.
2. Include the button above and a link to our  blog on your post.
3. Link our post up here on Sunday morning (or whenever :) )
4. Be a good blog reader, and leave some love for the two posts before yours!

Here's the Scoop on my week...


I was so proud of my Yearbook Club kids on Friday night at our Fall Festival! They did a great job of roaming around and taking pictures of the entire event. Now, I need to go through and delete the blurry ones so we can make some yearbook pages on Wednesday.

Wouldn't you know it, I finally caught my husband's cold on the one day I couldn't miss school - Fall Festival day. Hopefully the weekend will be enough to heal up and be ready for next week!

I HAVE to write lesson plans for this week, but I HOPE to also get my sub plans for next week done. We're leaving this weekend to head to my in-laws' for Thanksgiving.

What are you up to today? Link up and share!


Saturday, November 15, 2014

Bright Ideas Round-Up!


Welcome to the November edition of the Bright Ideas Link-Up! This one is a special one! Over the past 10 months, teachers have shared thousands of great ideas through our monthly Bright Ideas event. This month, we’re re-capping all of those great ideas, just in case you missed any! Below you will find some of my bright ideas from the past several months:

We shared some great ideas for using dry erase... off of the whiteboard... You can check it out here.

In August, we shared three of our favorite back to school tips...
We shared how highlighters have saved our sanity...

A simple trick for decluttering your computer area...
 

And an easy way to help students remember all of their passwords...

I hope that you’ve enjoyed these bright ideas, and that you have found an idea that you can use in your own classroom. Be sure to check out the link up below for tons more bright ideas from my friends!


Thursday, November 13, 2014

Tech Thursday: PowerPoint Photo Potential


Technology Thursday is a weekly linky dedicated to all things technology related. Share reviews of websites or apps you've tried, tech tips that make your {teaching or personal} life easier, and helpful tutorials. Our hope is that this linky provides a place for teachers to share and learn new ways to use technology and engage students!

Be a rule follower!
Rule #1: Include the image above and a link to our blog somewhere in your post.
Rule #2: Be a good blog reader...visit the two blogs who link up before you and leave some love on their pages!
Rule #3: This linky is not intended for product promotion. You may include products you've created in your posts, but they should not be the sole focus of the post.


I must admit that I have been more of an Excel person in the past.  I think we sometimes get stuck on a program and use it as our "go to" for everything.  That is how I was about Excel; I knew how to use the other Microsoft products but just ... didn't ....much.  Until this summer, I had only used PowerPoint for making a few presentations.

Wow! I didn't know what I was missing!  Being an Excel stuck in the mud, I have had to jump on a fast track trying to come up to speed on all the "potential" in PowerPoint.


Today, I am going to write about one of my favorite parts to PowerPoint.  I am going to blog on how to edit photographs or pictures.  This a really fast and easy way to get some fantastic effects on your photographs without having to learn an additional more complicated program like Photoshop.

We are going to focus on PowerPoint's Format tab and the Picture Tools.

The Picture Tools will appear when you have inserted a photo or clip art into your document and you have selected the object.  I'll just focus on photos now, but these effects can be done with any clip art. I will be using my beautiful daughter's volleyball photo for demonstration purposes.

PowerPoint Photo Basics

Just a note: these tips will vary slightly on a Mac.  I am a PC girl.

Cropping a Photo
Once you select your photo, you can crop the photo right in PowerPoint.  The Picture Tool tab will show up above the Format tab.

Select your photo.
Go to Picture Tools.
To the right, you can see the crop tool.
Click on the "crop" button and crop tools will appear on the edges of your photo.
Click and drag the tools to resize your photo.
Click again on the "crop" button to actually crop the photo.


Cropping a Photo into a Shape
Click on your image.
Click on the Picture Tool Tab.
Go to Crop and select the drop box this time.
Select "Crop to Shape" and choose the shape that you want.
Presto chango!
   

Correcting the Color 
Click on your photo image.
Click on the Picture Tool Tab.
Now direct your attention to the left side of the screen.
Select the Corrections button.


PowerPoint will show you what the picture will look like as you move over the mini pics.
Select the color corrections that you want and you are set!  The simple selections shown include Sharpening and Contrast.


Changing Colors
I particularly love black and white photos so I love this feature!

Click on the image.
Click on the Picture Tool Tab.
Again direct your attention to the left side of the screen.
This time select Color.

PowerPoint will show you what the photo will look like so make sure to hover over the mini pics before you choose.  The mini pics show simple choices such as Saturation, Tone, and Recolor.

Click to choose.


Even after you have changed the photo to black and white, you can click on the Color or Corrections buttons and find more ways to change your photo into the perfect image.


Artistic Effects
Click on the image.
Click on the Picture Tool Tab.
Direct your attention to the left side of the screen.
This time select Artistic Effects.
Mini pics will pop up with some cool changes for your photo.  Hover to see the effect on your pic.
Click on your favorite!  (BTW my daughter doesn't like these!)


Remove Background
Click on the image.
Click on the Picture Tool Tab.
Direct your attention to the left side of the screen.
Click on Remove Background.
A new menu will appear.

The new menu will give you the following options: Mark Areas to Keep, Mark Areas to Remove, Delete Mark, Discard Changes, and Keep Changes.

You use a fine point "pen" to move around the photo to select areas to remove or keep.  The pink areas are those that will be removed.  Please note that this tool works better on high contrast photos.


Here is the picture when I was finished. (Only a few minutes!  I promise!)


And here is the pic when I added layers of paper, graphics, and text!  This photo got the express approval of my daughter.  She loved it!


Hope these basic photo tips can help you in some way!

If you haven't already joined the PowerPoint "team" or are looking for a few new tricks, don't forget to keep reading our PowerPoint Potential series here on Teaching Trio!



Sunday, November 9, 2014

Sunday Scoop {11/9/14} + Giveaway Winner!


The Sunday Scoop is based on the popular 3-2-1 graphic organizers so many of us use with our students. Tell us three things you HAVE to do, two things you HOPE to do, and one thing you're HAPPY to do (because these days, we could all use a little motivation to find something to be happy about every week!). It's a short and sweet way to connect with each other every Sunday (or Monday... the linky will stay open all week!)
Here's what to do:
1. Just save the image above, add your text to it (we use PowerPoint), and post! You don't even have to explain yourself any further if you don't want to.
2. Include the button above and a link to our  blog on your post.
3. Link our post up here on Sunday morning (or whenever :) )
4. Be a good blog reader, and leave some love for the two posts before yours!

Here's the Scoop on my week...

So... I am pretty pumped about starting math workshop with my kiddos. They have been working so hard the last few weeks in math (and during our Daily 5 time). I think it is finally time to start with Math Workshop. I have waited this long because this group of kiddos had never experienced small group rotations like this for reading or math before. I didn't want to overwhelm them with both workshop and Daily 5. I am SO excited because we received our iPods through Donors Choose so that will be a new technology rotation!

Of course... nothing is more exciting than announcing a giveaway winner! Thank you all so much for entering our "New Birdie Giveaway". The winner is...


Thursday, November 6, 2014

Tech Thursday: PowerPoint Potential!


Technology Thursday is a weekly linky dedicated to all things technology related. Share reviews of websites or apps you've tried, tech tips that make your {teaching or personal} life easier, and helpful tutorials. Our hope is that this linky provides a place for teachers to share and learn new ways to use technology and engage students!

Be a rule follower!
Rule #1: Include the image above and a link to our blog somewhere in your post.
Rule #2: Be a good blog reader...visit the two blogs who link up before you and leave some love on their pages!
Rule #3: This linky is not intended for product promotion. You may include products you've created in your posts, but they should not be the sole focus of the post.

This week, we are excited to introduce a new series of Technology Thursday posts...


I know many of you already know this, but some may not... PowerPoint is NOT just for creating presentations! In fact, I probably use PowerPoint more than any other Office program these days. Unless I'm typing a paper (Word) or dealing with data (Excel), chances are good that I'm creating in PowerPoint.

Why, you ask? Freedom. Sweet Freedom! PowerPoint kind of lets you do whatever you want... there are no "lines" or margin to deal with like there are in Word. You can layer things on top of each other all day long and manipulate them in tons of ways!

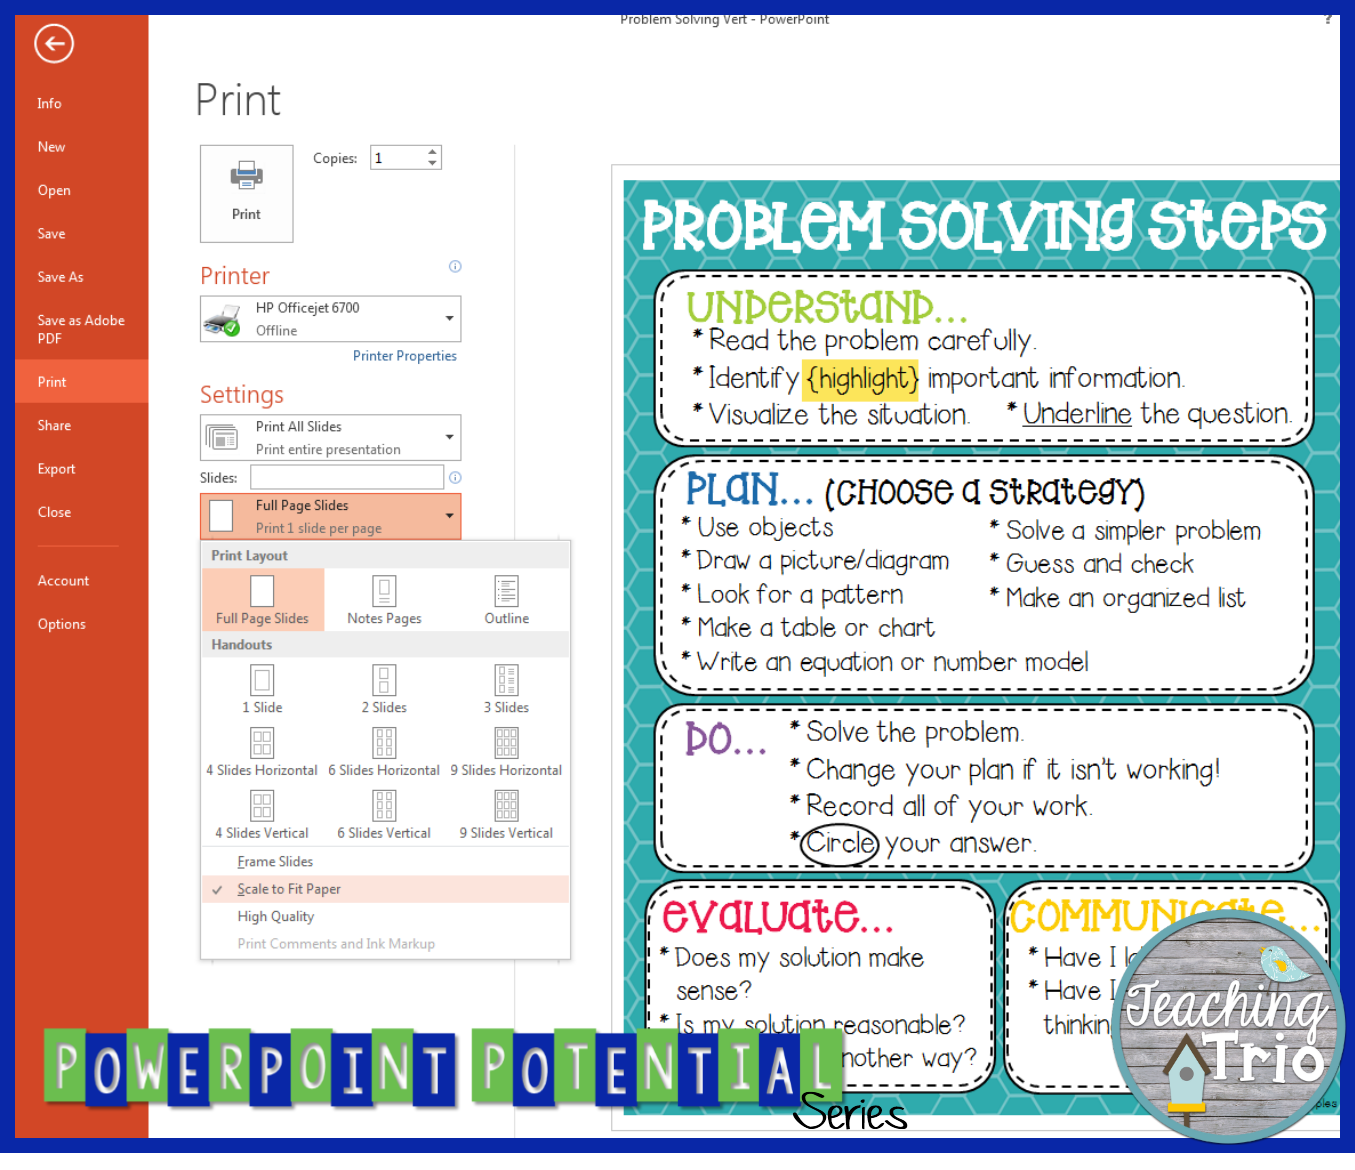
Our first tutorial is simple, but important... How to change slide sizes and print from PowerPoint. Here goes:

One of the first issues you may have thought of with using PowerPoint for something other than presentations is that the slides are not the same size as paper. Fortunately, this is an easy fix!


Open a new PowerPoint file. Select the Design tab at the top of the screen. Click Slide Size and then select Custom Slide Size.


I know a lot of people set their size to 8.5x11 because that's paper size, but I like to set my slide size at 8x10.5 so I don't have to worry about margins. Either way, set your size in inches, click OK, and you're good! 

Printing Tips...

Printing from PowerPoint has been something that several of my buyers have struggled with in the past. Here's the "how to" info you need to do it right! 


In your print settings, be sure you have selected "Full Page Slides" and check "Scale to Fit." Checking Scale to Fit will put about a quarter-inch white border around the image so that it prints without cutting off the edges (easily one of the most common errors I have seen when printing from PowerPoint).

If the file is printing without all of its graphics, be sure you have selected to print in COLOR, even if you're using a black & white printer. Otherwise, PowerPoint tries to save you ink by not printing background patterns and images. 

That's it for this week's PowerPoint tips. Here's a peek at what we have planned for future posts:
*Embedding fonts
*Manipulating images, shapes, and text
*Saving flattened images
*Creating your own design templates
*Aligning elements
...and more! 

What would you like to learn about PowerPoint? We are looking for ideas for future posts and would love to answer your questions! Leave them in the comments, and don't forget to link up your own Tech Tips! (Don't worry, your posts do NOT have to be PowerPoint related to link up!)

Don't forget to enter our giveaway before you leave! You have through Saturday night to enter, and we will announce a winner in this week's Sunday Scoop!