Showing posts with label PowerPoint Tips. Show all posts

Thursday, October 8, 2015

Replacing Fonts in Just 5 Clicks {Tech Thursday}


Technology Thursday is a weekly linky dedicated to all things technology related. Check out our Tech Thursday page for details on how to link up!

Whether you’re updating old resources or just decided that the font you initially chose wasn’t quite right, replacing fonts can be a time-consuming task. Fortunately, PowerPoint has a solution for us!
Replacing Fonts in 5 Clicks

Starting with the 2013 version, you can replace a given font in your PowerPoint with just a couple of clicks! Here’s how…

In PowerPoint, look at the top right hand side of the main ribbon area. Click the drop-down arrow beside “Replace,” then click “Replace Fonts.”
Slide2

Next, choose the old font you want to replace from the first drop-down menu. Choose the new font from the second drop-down menu. Click “Ok”, and all of the text in that font will be replaced by the new font.
Slide3

Font sizes will not change, and because of the difference in spacing from one font to another, you might have to adjust the size or spacing of your text. Other than that, though, your font replacement is finished, in just 5 clicks!

Have a time-saving tip? We’d love to hear it!

Link up below with your own Website or App recommendations, Tech Tips, Tutorials, or anything else tech-related! We can't wait to learn from you!


Thursday, March 5, 2015

Tech Thursday: Long Pin How-To Video


Technology Thursday is a weekly linky dedicated to all things technology related. Check out our Linky Parties page for details on how to link up!

It is time for Tech Thursday! This post is going to be all about creating long pins using PowerPoint. I have even created a video (wah... I can't believe I am sharing it with y'all... I sound like a looney-tune). I hope that this post helps you create some amazing long pins for your products!
                         
There you have it! Yep... I ramble. Sorry!! This was the first video I have ever made, so hopefully the future ones will be little better! Just so you know... my lowercase d key now works. Not sure what was happening during the video. Technology sometimes... :) Link up below with your Tech Tips for the week!!


Thursday, January 8, 2015

Tech Thursday {1/8/15} Saving and Securing your Products


Technology Thursday is a weekly linky dedicated to all things technology related. After you read this great tip, link up your own tech posts at the end. Check out our Linky Parties page for details on how to link up!


So you've used our PowerPoint tips to create a fabulous resource, and you're ready to share it with the world! The last thing you absolutely MUST do is secure your document. Almost all clip artists require their art to be "flattened or secured" if you are selling digital files of any kind. (Side note - Be sure to read and KNOW the terms of use before you use clip art in your products!)

I am always amazed at how many people think saving your file as a PDF makes it secure. This is NOT the case! As an example, I'm going to show you one of Cassie's products (so you know it's not one I created), and show you what can be done to it if it is not secure. Ready to have your eyes opened? (Don't worry, I have a fix for you!)

DISCLAIMER: Cassie always, always, always secures her files! She sent me this unsecured product file specifically for this post, and I promise, I did not save any of the art I lifted!


I'm not going to tell you how I did it, but it was beyond easy to snag the adorable clip art on this unsecured page and save it. You might notice that I opened the file in Adobe Pro, but the free reader will do the same thing. So you're not safe thinking that most people don't have the software to do this.

Why should you care? It is against the terms of use for nearly every clip artist I have ever purchased from to sell files with their graphics unsecured. It allows your buyers to steal their work. It is morally and legally wrong!


In this picture, you can see that I can type whatever I want over her product title. This goes for other areas of the product too. I would hate for someone to (a) take my product and try to resell it as their own by removing my information, or (b) change parts of my product. If it's not up to my standards, and a prospective buyer sees it, my reputation goes down.

Now that you understand why we HAVE to secure our files, let's learn how to do it!

I'll be showing you how to secure files in Adobe Pro, which costs $119 for educators. In my opinion, it it 100% worth the cost, but I will also link another option at the end of the post.

First, you need to save your file as a PDF. The process is the same no matter which Office program you use to create, but these images are from PowerPoint.


Click File > Save As and choose PDF from the File Type menu. From here, you can give your file a name and click save. If you want to save only certain slides rather than the entire document, you can do that by clicking Options. I have seen tutorials that say you can secure your file right here in PowerPoint, but when I tried this, my file was definitely NOT secure, so I recommend going the extra step to secure directly in Adobe or another PDF program. I've also seen some recommendations to save the PowerPoint slides as flattened JPG files, but this sometimes makes your graphics fuzzy.

Once your file has saved as a PDF, it will likely open automatically. To secure your file, click Tools > Protection > Restrict Editing.


A popup will appear for you to enter a password. I recommend using the same password for all of your TPT products, because you will need to enter it if you ever want to remove the security.


Once you enter your password, you will see a warning that your security settings will not be applied until you save the file again, so my next step is always to click Save!

A note about editable products...
If you create editable PDF files, you will need to secure your PDF using a slightly longer process that accomplishes the same thing.


Click File > Properties > Security tab. Change the dropdown menu from "no security" to "password security." A popup will appear for  you to select security settings. Under "permissions" check the box next to "restrict editing & printing."


Beside "printing allowed" choose high-res. Beside "editing allowed" choose "commenting, filling in form fields, etc." Then type your password in the password field. You will confirm the password on the next popup window and will need to save your file to save the changes.


When you've done it right, you will see (SECURED) at the end of your file name. Now you can rest easy, knowing that your work and the graphics you used are all protected!

As promised, here's a link to Cassie's post on her blog, Funky in Fourth, about how she uses PDF Connect Suite to secure her files.

Link up below with your own Website or App recommendations, Tech Tips, Tutorials, or anything else tech-related! We can't wait to learn from you!


    An InLinkz Link-up
   

Thursday, January 1, 2015

Tech Thursday and 500 Follower Giveaway!!


Today's post is a two-parter. The first is our Tech Thursday Linky. The second is we are having a GIVEAWAY  to celebrate the new year and hitting 500 followers. Be sure to read ALL the way to the bottom of the post to enter in the giveaway and see all the amazing products you could win from our generous bloggy/TpT friends! First Things First...

Technology Thursday is a weekly linky dedicated to all things technology related. Share reviews of websites or apps you've tried, tech tips that make your {teaching or personal} life easier, and helpful tutorials. Our hope is that this linky provides a place for teachers to share and learn new ways to use technology and engage students!

Be a rule follower!
Rule #1: Include the image above and a link to our blog somewhere in your post.
Rule #2: Be a good blog reader...visit the two blogs who link up before you and leave some love on their pages!
Rule #3: This linky is not intended for product promotion. You may include products you've created in your posts, but they should not be the sole focus of the post.


This week's PowerPoint Potential is all about how to save your PowerPoint as an image (png or jpeg). These save options are especially handy when you go to make previews for your TpT products. I am going to walk you through how to save as a picture (not the entire slide) and also how to save your entire document as a picture.

Saving a Few Items as an Image    I use this a lot when I create something that I don't want to be full document size. The first thing you need to do is select all the items you want to save as an image. You can do this by either command + a (mac) or ctrl + a (pc).
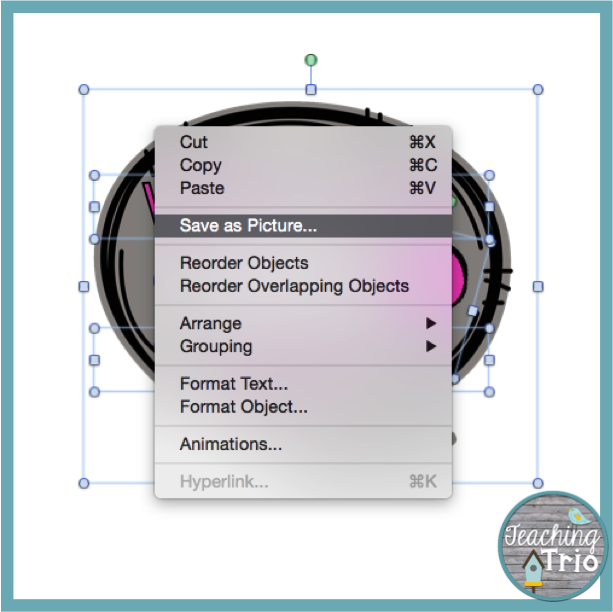
Then do a quick control + click and a dropdown menu should appear. Select save as picture.


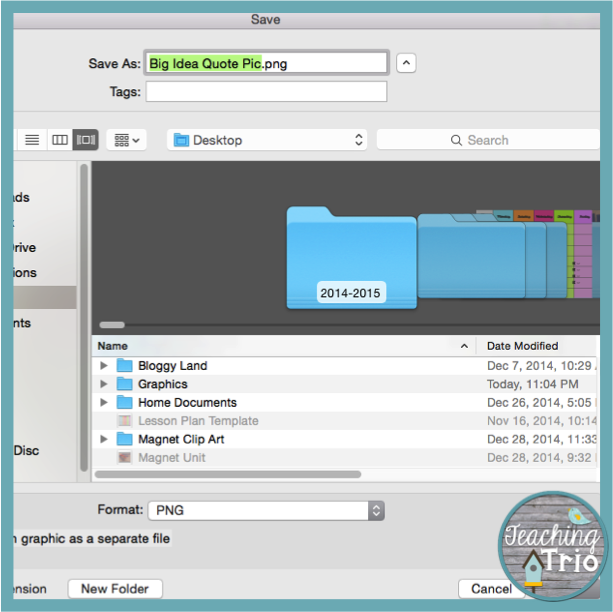
The normal save as menu pops up and you just need to rename the file and select where you want to save it to.


Now when you go to where you saved your picture, you will find your new file! Open it up and you will find that ONLY what you selected in your document saved as a picture. This means I have an image with a transparent background instead of the white background like the document!!!


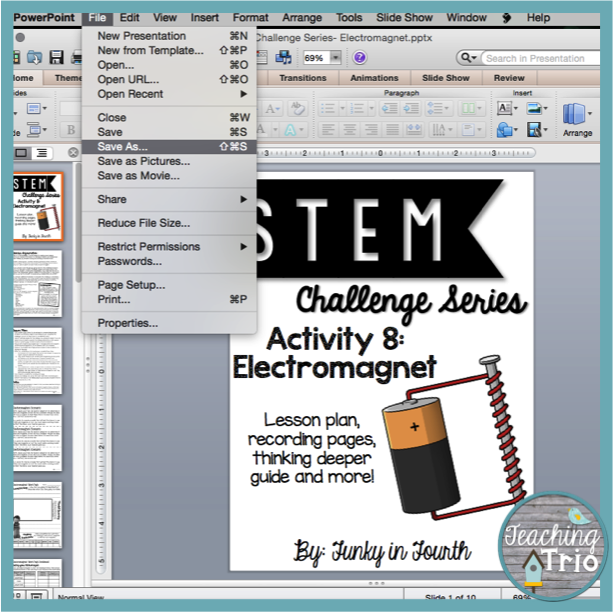
Saving an Entire Document as Images -  I use this option ALL the time. The most frequent time is when I am making previews for my TpT products. Simply open your product and go to file save as.


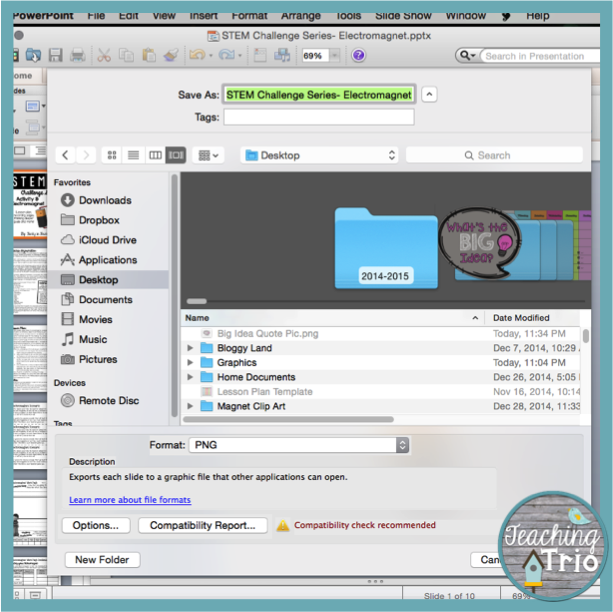
The save as box pops up. Select a file destination for your save. For these I always save to my desktop. It just is more convenient than saving to my documents. (When I am done making my preview file for the product, I delete this file of images because it is no longer needed.) Then go to the bottom and where it says Format: select either PNG or JPEG.


Go to wherever you saved it and open up the folder. Inside will be an image for each slide of your document! Pretty fabulous right?! Simply drag these images into your preview file! Easy!
There you have it! Saving your files as PNG or JPEG is a great way to use your documents in different ways! Link up at the VERY bottom of this post with your Tech Thursday Tips!

***************************************************


ON TO THE GIVEAWAY FUN!!!

We are celebrating in a big way! We have three separate prize packs (primary grades, intermediate grades and TpT sellers) that you can enter to win. There are over 30 prizes in all! Check out the graphics below to see what you can win and be sure to enter the Rafflecopters!


a Rafflecopter giveaway

***************************************************


a Rafflecopter giveaway

***************************************************


Thursday, December 18, 2014

Tech Thursday: 5 Save Tips for Office Apps


Technology Thursday is a weekly linky dedicated to all things technology related. Share reviews of websites or apps you've tried, tech tips that make your {teaching or personal} life easier, and helpful tutorials. Our hope is that this linky provides a place for teachers to share and learn new ways to use technology and engage students!

Be a rule follower!
Rule #1: Include the image above and a link to our blog somewhere in your post.
Rule #2: Be a good blog reader...visit the two blogs who link up before you and leave some love on their pages!
Rule #3: This linky is not intended for product promotion. You may include products you've created in your posts, but they should not be the sole focus of the post.


This is the 6th installment in our PowerPoint Potential series, and I'm excited to share something I learned over the summer! I have to admit, I had never paid any attention to the save options in PowerPoint (and Word, and Excel) before, but there is a lot of good stuff hidden in those menus!

First, let's talk about some things you can do when you click Save Options...
1. Autosave Intervals - The default is usually 10 minutes. I don't know about you, but I can get a lot done in 10 minutes that I don't want to lose! I change mine to every 3 minutes. In Word & Excel, I set it at 1 since the files usually much smaller.

2. Embed Fonts - This was a HUGE game changer for me! You know that cute font you have at home that you really want to use in the PowerPoint you're making for your class, but you know you can't because the IT department will.not.let.you.install.anything on your school computer? If you embed the fonts in your file (PPT or Word), then you can see and use the cute fonts you've installed at home in this file on any computer - anywhere!

All you have to do is check the box that says "Embed fonts in this file." If the file is final and you won't change it, you can leave it set to "embed only the characters used" (for a smaller file size), but if you plan to edit on another computer, change it to "embed all" so that all characters in the font are embedded. Just to clarify, it will only embed the fonts you have used in this file. Thank you, Mary from Fit to be Fourth, for sharing this one with me last summer!

Now, let's look at the next option when you click Tools, General Options...
3. Password Protection - Did you know you can add a password to your file to protect it from unwanted changes? This is where you can do that! I know most of us secure our PDF files for this purpose, but if you are making and selling a PowerPoint file, this is a must-do! Be sure to enter your desired password beside Password to Modify instead of Password to Open. You wouldn't want buyers not to be able to open your file! 

Last, but not least, we'll look at the last option, Compress Pictures...
4. Delete Cropped Areas - This option deletes parts of pictures you have cropped off. This is especially helpful when you've used a 12x12 paper to fill a 3 inch shape in your file, and can really make a difference in file size!

5. Target Output - What you do here will depend on how you're using this file. The number in parentheses beside each option refers to the number of pixels per inch (ppi), which determines the size of the photo. For my print products, I want to ensure that no one complains of pixelated pages, so I leave it set to use the document resolution. If you are showing it as a PowerPoint only (or printing notes pages for students), you can change it to Screen.

I hope these tips help you make the most of your PowerPoint save options. We'd love for link up with your own tech tips while you're here. Since next Thursday is Christmas, we will be taking the week off, but be sure to stop by the following week, on New Year's Day for a New Year surprise!  


    An InLinkz Link-up
   

Thursday, December 11, 2014

Tech Thursday: Task Card Basics


Technology Thursday is a weekly linky dedicated to all things technology related. Share reviews of websites or apps you've tried, tech tips that make your {teaching or personal} life easier, and helpful tutorials. Our hope is that this linky provides a place for teachers to share and learn new ways to use technology and engage students!

Be a rule follower!
Rule #1: Include the image above and a link to our blog somewhere in your post.
Rule #2: Be a good blog reader...visit the two blogs who link up before you and leave some love on their pages!
Rule #3: This linky is not intended for product promotion. You may include products you've created in your posts, but they should not be the sole focus of the post.
Do you love task cards? Today's PowerPoint potential post is all about how you can make a template and use some grouping and aligning buttons to make task cards. I will first show how to make a template so you don't have to do the layout for them EVERY SINGLE TIME! So here goes... are you ready for picture overload???

First things first. Let's make a template for those pesky task cards. I use task cards for a variety of things in my classroom. They are a center, they are part of my whole group lesson, they are an extension activity for my high thinkers, they are part of a review before a test... it is task card heaven in my classroom. I love how versatile they can be. They are also easy to differentiate with. Usually when I make sets of cards, the beginning task cards are easier and they progress in difficulty. The task cards all look the same and my kiddos have yet to catch on that they are different levels. I just assign specific cards to specific kids. :) 

The first step in creating a template is to open a new document. I have "empty/blank" templates saved already that are sized to allow for margins (i.e. 8"x10" and 10"x8"). Then you will want to create a table. The number of task cards per page can be changed by just adding more columns or rows to your table. I have found that 4 per page is convenient. 
The reason I have started using a table as a guideline for my task cards is because it allows for fewer cuts. Some sellers/teachers create task cards with a white empty space between the task cards. This empty space does not sit well with the perfectionist in me. I would spend at least an extra 2 minutes per page to cut off all that white on the edges. Super time consuming. Anyways... next step is then to drag and reposition your table so it is on one of the corners. Then drag it so it takes up the entire page.
Now maybe your opinion about the blue background is different than mine... but I HATE IT. Quick fix. Select all your boxes by clicking in one and then dragging all the way to the opposite bottom corner. Then go up to "fill" under your tables button. Click on fill and select no fill. This will make your background transparent! Wahoo!
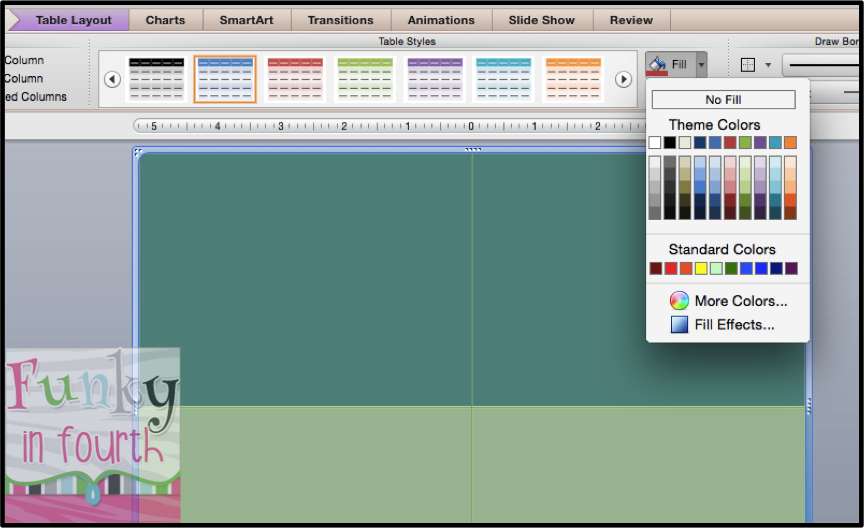
We are almost done with the template, I promise. Next step is to change the lines so that they are just guidelines for your work. For my template the lines are gray, but then with the example of task cards I will show later, I just changed the template table to have white lines using the same steps. There are tons of options under the same table button you were just in with the previous step. If you click the line on the right side you can change the thickness, type of line (dashed, dash space, full line, double line, etc.) and also the color. The great part is you can make the lines on the outside of the table not be there! This makes the inside lines only guidelines for the cuts and your outside guidelines becomes whatever background you choose. 
The trick is to click on your line choice, color choice and then select the lines that you wish to be available by clicking the little grid above the pencil. You can mess around with the options until you find one that works for you. 

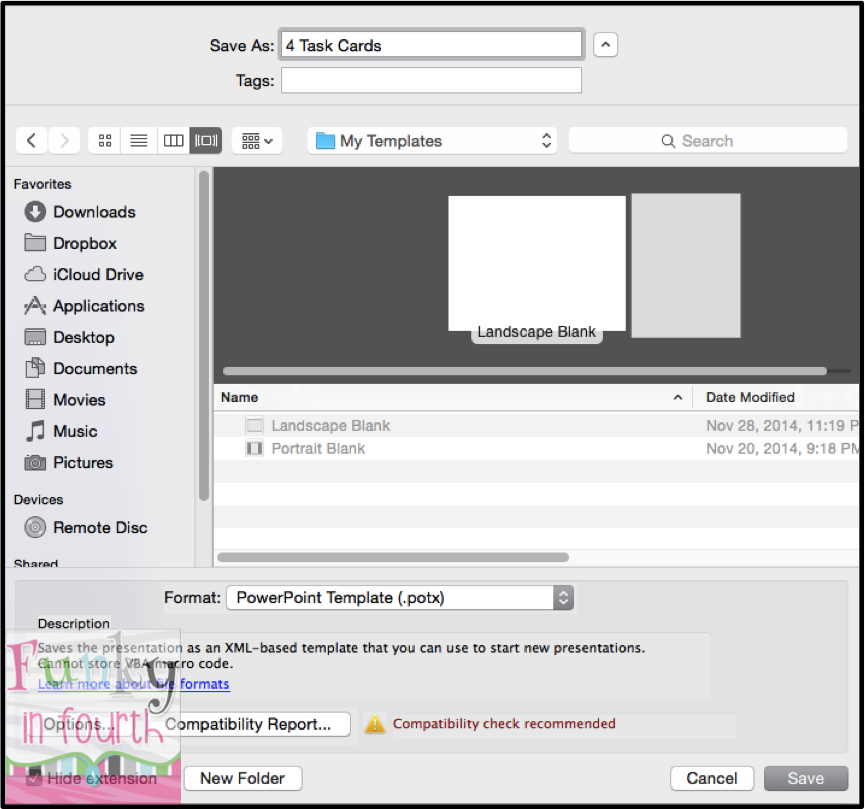
The last step is to save this as a TEMPLATE. That way you don't have to redo everything you just did every time you make a task card set. You just open this template and ta-da... it is ready for you! So do your normal file, save as step and title it something that you will know what it is. I titled mine 4 Task Cards just to show you an example. Then you want to select the file type as a PowerPoint Template. It should automatically switch to find the folder "My Templates" so double check that at the top. If it doesn't automatically switch, then do a search for that folder before you save. Having your template saved in that folder is what makes your template show up when you first open PowerPoint.
Now that we have a template saved. Go ahead and close out of PowerPoint completely and reopen it. Your new task card template should show up right there when it first starts. Select it and you your new file should pop up looking similar to this (it might be slightly different depending on what features you chose with the lines).
This is where the fun begins! Find a fun background that you absolutely love. I am officially obsessed with Kristen's Nautical Cheer Digital Papers set. Drag or insert your image into the new file. Don't worry... your template is still blank. When we get done, we will save this as a new file and the template won't be changed at all. Resize your background so it fits your page.
Then make sure your image is selected and click on the format picture tab. Then click on the arrange button. A list of options should pop up including send to back. Click it and your background that you inserted will reorder to the back behind your table template. This is why we set the fill to "no fill" when we set up the table. 
Your gridlines from your template should appear (remember they will be whatever color your template was set up as). You can change the color of the lines by clicking on your table and going to the table tab and then selecting the color/line options that you desire. Now drag in a frame/image with a white background. I used Lovin' Lit's Huge Seller's Toolkit Bundle. Resize the frame to fit inside the gridlines of your table.
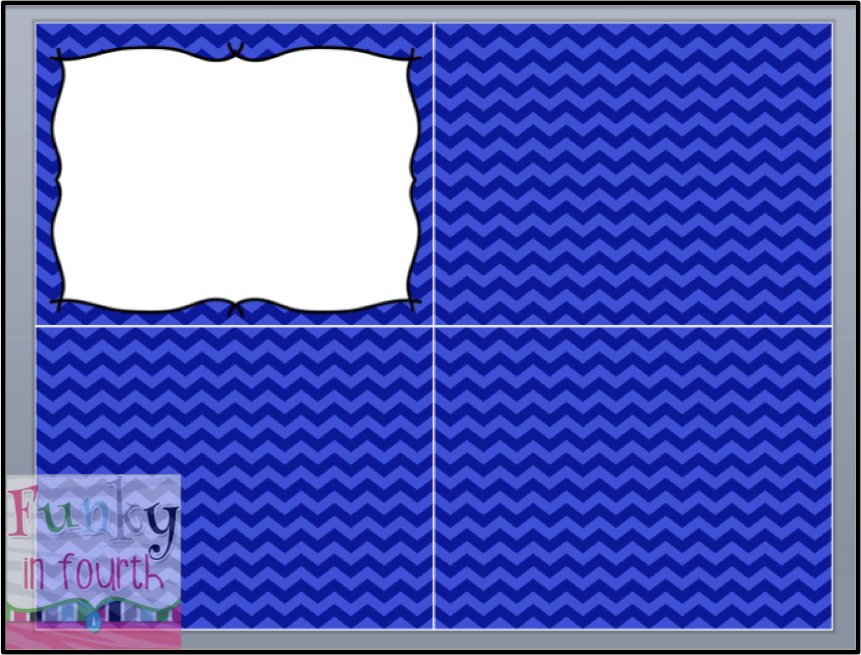
Next add a text box. I try to get it kind of where I am going to want it to be... but I am not perfect. I also don't worry about if it is in the center or not. We will use some fancy settings to make sure that it is. The next image shows the text box that I created. You can tell that the text box is not centered with the frame. That is totally okay. You can also tell that the gridlines are definitely white. Sometimes you have to change the color so that they show up on the background. If you have a predominately gray background, you don't want gray gridlines! Once you have your main text box on the frame, select both the text box and the frame (use the shift key to select more than one object). 
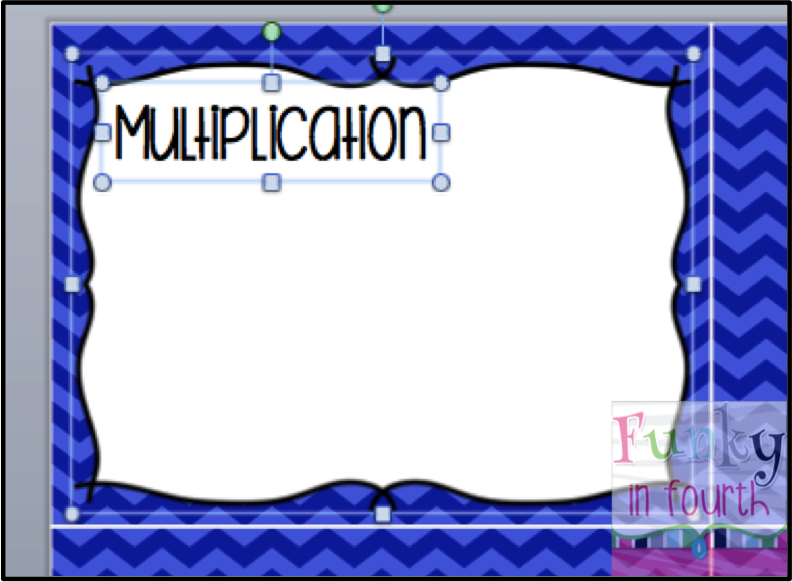
Once you have both objects selected, go to your format tab again and go to the far right side. Click on the button that says align. A variety of options pop up and you can select align center. This will move the objects so that they are centered. Please note: this does not mean that they will be centered in your table! They  are only centered to each other. You will need to adjust their exact location on the page. 
Your next step is then to group these objects together. That way, whenever you move them... the alignment stays centered. Add in the other graphics, text boxes, features, etc. that you wish and you should have a task card completed. Select all of your items that you just added and the original frame/text box group and group all of the elements together. Copy and paste this new group so that you have a task card "layout" in the next box. 
Next super easy step is to get them to line up. Select your two task card "layouts" and go to the format picture tab and then select align. Scroll down to align middle so that the middle of your task cards are now aligned. If you don't have the second layout close to where you want it, it might move both of them (one up and one down). If this happens just drag them up a little so they are in the middle of your table box. 
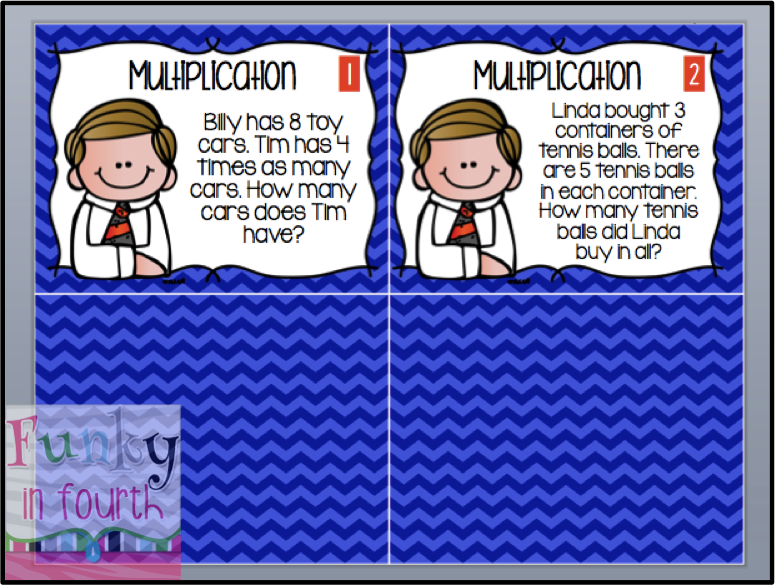
Repeat the last step to get two more task card layouts on your page. As you can see below, I have moved the second set of task cards so now they are all lined up and perfectly aligned. I also changed the text to make 4 different task cards. You can use those align buttons to align to center and align to middle.
And there you have it... using PowerPoint to make a template for task cards and making a page of task cards. Simply select all, copy and paste onto a new slide to add more cards. Make sure you save this file as either a pptx or pdf instead of a template. No more annoying white line of image free space in-between the task cards. 6 simple cuts and you are done! 

I hope that these tips/tricks help make task card creation a little bit easier for you and your classroom. Make sure you link up below with your awesome tech tip for the week!