Showing posts with label DIY. Show all posts

Monday, June 30, 2014

Monday Made It: DIY Necklace Storage

It's Monday, so I'm linking up with 4th Grade Frolics to share a couple of Made It's.

I don't know about you, but my necklace collection has recently outgrown my jewelry box. They were taking over the entire dresser actually! (This is probably because of my Stitch Fix and Jane.com obsessions!) I searched Pinterest and found this adorable idea: Turn an old frame into a gorgeous necklace display. Instead of using one of the half-dozen frames we had lying around, though, I saw this one at Hobby Lobby, and had to have it! It matches our bedroom perfectly!

I can't wait to get it on the wall, but I'm going to have to, because this frame is HEAVY and I don't have any drywall anchors at the moment :(

If you want the how-to, keep reading. If not, scroll down, because there's one more made-it down there!

You're going to need...
* a frame (this one is 16x20)
* some cork (I used the 12x12 tiles, but you could also use the roll that they sell at Hob-Lob)
* hot glue
* burlap
* duct tape (of course!)
* nailheads or pushpins to hold your necklaces (I found aluminum push pins at Office Depot)

Here's what to do...
Take the backing out of the frame. Hot glue your cork onto it. Make sure you trim the edges close, because you'll need this to fit back into the frame!

Lay your frame back on top of your burlap, with the cork side down. Trim your burlap to 3-4 inches wider than your frame back. 

Cut diagonally across the corners of the burlap.

Duct tape one side of the burlap to your frame. Then pull very tightly and tape the opposite side.

Keep working around the frame until you have it all taped down. Don't worry if your duct tape doesn't match like mine happened to...no one is going to see this!

Put you burlap & cork covered backing back into the frame, without the glass.

Now, just use your necklaces as a guide to push in your nailheads or push pins. Hang it, and admire!
Made it #2 is kind of a cheat because I designed it, but technically Zazzle made it. If you haven't ever looked at their stuff you should...or maybe not...because I spent *too*  much money when I did :) You can upload your own images or search for ones that someone else has created and order them on tons of cool products. 

I decided I needed a custom printed vinyl binder to use for this year's Teacher Binder. It arrived last week, and I couldn't be happier! These are quality binders, y'all. with  my design and my name right on them! No more printing & trimming & never having the inserts fit quite right!

You might recognize that as the same pattern in my Perfect Teacher Planner from TPT. That's because I custom made it to match! I spent Friday getting pages printed and ready to go for the fall!

While I was at it, I also made one to match the Turquoise Dots planner, and Juliet has one on the way to her as we speak. I can't wait to see hers too!

Because I think these are awesome, and I want to give you a chance to try them...if you order a binder between now and midnight Thursday (7/3/14), I will give you the matching planner inserts for free! Just email me after you place your Zazzle order and let me know! (Link at the top of the page)

Happy Monday everyone! 


Monday, June 9, 2014

Monday Made It: EOY Gifts, TPT Planner, & a giveaway!

Today I'm linking up with Fourth Grade Frolics for Monday Made It to share two things I made over the last few weeks - one crafty project and one digital project.

I made these cute end of the year gifts for my team (and myself) this year. It took a lot of sneaking around to get all of my teammates' students' fingerprints without them knowing, but fortunately, we have an awesome math enrichment teacher who let me barge in on her class a couple of times. Sadly, I forgot to take a picture before I gave them to my teammates, so all you get to see is mine.
The idea is to have all of our students every year add their fingerprints to the tree. Over the years, the tree will grow bigger and bigger!

Here's a little trick for you to make the bows on top...
1. Cut a piece of ribbon longer than you think you need.
2. Fold the ribbon into a loop like this:
3. Tie a regular old knot in the center of the loop.
4. Fluff out your bow! (This works WAY better with wired ribbon than it does with regular ribbon.)

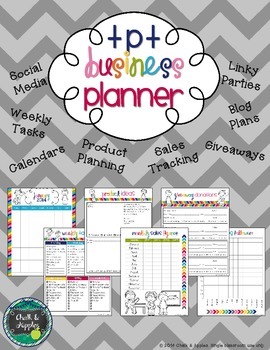
The other little project I've been working on is a planner to keep all of my TPT /Blog ideas and info organized. A lot of work has gone into this planner to make it exactly what I needed and wanted, and I am super proud of how it turned out! I'm calling it my TPT Business Planner, because I believe that in order to be successful with TPT, you really do need to treat it like a business.

Here's a peek at what you can find inside:


...and even more!

For today only, the planner is on sale for half price! Want to snag a free copy instead? Pin it to Win it! Pin any of the images above, comment below with the URL of your pin, and I will randomly choose a winner to get a free copy!


Thursday, May 8, 2014

Not the same old Mother's Day gift

Allow me to introduce one of my favorite-amazing-third-grade-teacher-friends, Juliet. She is the brains behind a very new TPT store: The Tech Crazy Teacher. I asked her to guest post today to show you the fabulous Mother's Day gift idea that she had for this year, since I haven't gotten anything together yet. PS: You'll be seeing a lot more of her soon *wink*.

Here she is...


I really struggle to find the right projects on Mother’s Day.  I think it is because I am a mom, and it means so much to me.  I want to give my students’ moms something special--something they will treasure and that still has an impact 10 years from now when their kiddo is going off to college and is moving out.   Maybe this overwhelming need to make an extraordinary Mother’s Day project is because it happens to be my son’s senior year, and I just want to hang on to his little handprints from Kindergarten and cry. 

Last year I watched almost all the students in my school parade out on the Friday before Mother’s Day.  I would say a good 80% of them were carrying a planted flower in various types of containers.  I am not dissing the plants and flowers.  Okay.  Okay.  Maybe I am anti-flowers because their life span in my care seems to be about 2 weeks. 

So what is a teacher to do?  Pinterest search.  Check.  Teachers Pay Teachers.  Check.  Examine what I did in the past.  Check.  Blogs.  Check.  Ask teacher friends.  Check.  I am still not really inspired.  What is left to do?  Create a project that combines some of the best elements from the other hundreds of Mother’s Day gifts I viewed.

I brought my camera to school and took photographs of my students.  I focused on close-ups of their faces.  Any camera can do this and almost all phones will take great pictures.  Here are a few tips to take a great picture. 
1.  If you are in the sunlight, use a flash.  This will get rid of shadows.  Find the shade if you can. 
2.  Get close.  A picture becomes more personal the closer you are. 
3.  Take more pictures than you need.  I delete more than I save. 
4.  Crop and resize pictures.  Most sites will let you upload a picture and then crop them for free. 
5.  Try making the pictures black and white.  Black and white pictures are timeless. 

Here is a good list of tips from Kodak on taking excellent pictures.

I then chose 2 of the pictures of each student to print out.  Cropped, turned black and white, and then sent off to my local photo shop.  (I used Walgreens.)

At Hobby Lobby (any framing shop), I bought some matting board.  They had about 20 12x12 boards in a package for less than $10.  I then added white acrylic paint, double stick tape, and ribbon to my cart.

I painted each student’s hands with the paint and had them make a heart with their fingers.  (See picture).  Then we placed their handprints on the matting board upside down so the heart would be right side up.
  

I added the pictures and had the students write, “I love you!” the date and their names on the mat.  Attach the ribbon and you are finished.

I LOVE the outcome of this project.  As a mom, I would so hang this up and keep it forever.  That is exactly what I was looking for.  It’s different.  It’s meaningful.  It’s personal, and I think it’s extraordinary. 

~Juliet

Sunday, August 11, 2013

Monday Made-it! Teacher Toolbox re-do with Mod Podge

I'm linking up wtih 4th Grade Frolics for this week's Monday Made-It with a project I did a couple of weeks ago... my updated Teacher Toolbox!

I made my first Teacher Toolbox last year, and LOVED it! In fact, my first TPT product was the label set that I had created for my toolbox. I wish I knew who to credit with the original idea, but I have no idea (aside from that it was on Pinterest). The original directions I read said to use double sided tape to attach your labels inside the drawers, so that's what I did. It worked fine for a little while, but by the end of the year, my toolbox looked like this:

As you can see, the tape definitely lost its stickiness over the course of the year. One of my labels was actually lost!

I kept reading that people Mod Podged theirs on, but I was worried about the ink bleeding since I printed on my inkjet printer. A little internet research was all it took to find an easy, and FREE solution!

HAIRSPRAY! Yep, the solution was right on my bathroom counter. If you spray the entire page with a light coat of aerosol hairspray, it will seal in the color.

The rest of the process is really simple:

Cut out your labels, and get your Mod Podge and brushes together. I used an old envelope to paint on, since it was what I had handy.

I found that the trick is to use a thin, light coat of Mod Podge on each label. Then press it onto the inside of the drawer. Don't worry if it doesn't go on straight, you have a couple of minutes to reposition the label before it starts to dry.

I love how it turned out! Probably more than the original. And I'm so excited that I figured out how to mod podge over printed papers without ruining it!

If you like my Teacher Toolbox Labels, both of these and a dozen other color/pattern options are in my TPT Store. Click on the photo below!


Monday, July 29, 2013

Monday Made It - My personalized teacher planner!

I never seem to find a teacher planner I like, so last year I decided to make my own. I learned a lot the first time, and I updated it this year.  I am SUPER excited about the teacher planner I made myself for this year!

I included the following sections...

Calendar Tab
  • I added our district's yearly calendar for reference, because I always seem to be searching for my copy.
  • Birthdays page for the entire class
  • 2013-2014 monthly calendar. I didn't make this one because they are super time consuming to make, and there are SO many cute ones on TPT for free this year!
  • This year, I used Marshall in the Middle's Freebie Calendar, and I am LOVING it! Grab yours by clicking the picture below.
Grades Tab
  • I added 26 gradebook pages so I'd have one for each subject, for each quarter.
Curriculum Map Tab
  • Pages for year long planning. Maybe if I do a great job of penciling it all in this year, I can type it up next summer, and not have to reinvent the wheel (again)!
Parent Communication Tab
  • 2 pages to enter my students and parents' contact information
  • 10 copies of the parent communication log
Notes Tab
  • Full & half page notes sheets for all those meetings :)
You may have noticed that there are no lesson plan pages...That's because a coworker introduced me to an AMAZING online planning site that I am going to use again. (I'll blog about it once I get mine set up for this year!)

Other things you might want to add: state/common core standards, textbook pacing guides, etc.

If you're still reading, and you want to make your own planner this year, head over to my TPT store to get yours. Or better yet, be one of the first TWO people to comment on this post with your email address, and I'll send it to you for FREE!

Happy planning, everyone!